We are glad to share with you about the results of our work and company news and give you timely developments and personnel appointment and removal conditions.
Use 3D printing while the shape, scale or gameplay interaction still needs physical review. Consider rapid prototype tooling when an injection-molded sample can settle a material, assembly or molding question before the production-tool investment. Move into a production mold when the product definition and DFM decisions are stable. Each route produces a different kind of evidence, so approve samples for a stated purpose and carry those decisions into the next stage.
Before tooling, issue one controlled package containing the latest 3D models, any critical 2D dimensions, a component matrix, material and color requirements, decoration files, assembly information, quantity assumptions and sample acceptance criteria. The DFM response should record product-structure risks, the proposed cavity and parting strategy, cooling, ejection, core pulling, printing access and every open assumption. Approve a named file revision, not a screenshot or an email that says “looks good.”
Choose one nominal wall thickness for the main shell, then map every region that is thinner or thicker. Core out heavy bases and solid masses where the hidden geometry allows it. Use ribs, gussets and bosses to provide local support without recreating a thick block at their roots. Blend required changes gradually, and review the wall map with the selected resin, gate position, cooling layout and cosmetic surfaces. There is no safe universal number for every pawn, token or miniature.
Mark protected surfaces before choosing a gate. These usually include the visible face, player-touch area, standing plane, mating features and print zone. Compare several gate positions by their flow length, thickness transition, weld-line location, last-to-fill area, packing path and removal method. A suitable location fills the part without placing the gate witness or a predictable flow defect on a critical surface. Use gate-location analysis to screen candidates, then confirm the selected position with a full fill-and-pack review and molded samples.
Choose the likely mold-opening direction first. Run draft analysis against that direction, then classify every surface as pull-clear, pull-parallel, reverse-drafted or controlled by a separate moving tool component. Give extra attention to deep walls, recessed details, textured faces, ribs, bosses and features that shrink onto steel. Fix a dimensional datum before applying draft so the taper does not quietly change a base diameter, peg fit or artwork area. Final draft values should be agreed during DFM for the selected resin, texture and mold design.
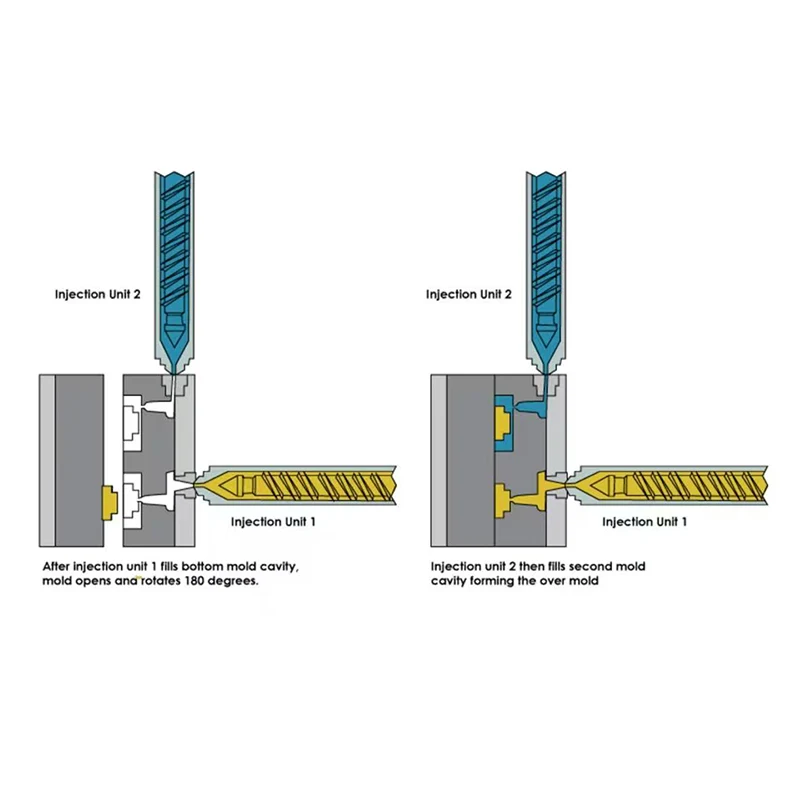
Some plastic components cannot achieve their required structure, appearance, sealing, grip, or functional integration through a single injection molding operation. When a molded part needs an additional material layer, insert, functional feature, or secondary molded section, Secondary Forming Injection Molding can provide a suitable manufacturing approach.
We use cookies to offer you a better browsing experience, analyze site traffic and personalize content. By using this site, you agree to our use of cookies. Privacy Policy

 10 2026-10
  30 2026-09
  15 2026-09
  11 2026-09
  11 2026-09
  28 2026-08